
Comment COURSE and I’ll send you the exact blueprint I use to create visuals like this. Belly Dancing collection 💃Which one is your favorite? Animated with @klingai_official #ai #midjourney #aiartist #aiart #midjourneyart #aidesign #aifashion
Comment COURSE and I’ll send you the exact blueprint I use to create visuals like this. Belly Dancing collection 💃Which one is your favorite? Animated with @klingai_official #ai #midjourney #aiartist #aiart #midjourneyart #aidesign #aifashion
This kind of post doesn’t win because it’s loud—it wins because it’s irresistibly polished. You’re basically looking at a fashion editorial still that happens to live inside a Reels feed. The result: people stop, stare, and then do the one thing the creator asks for.
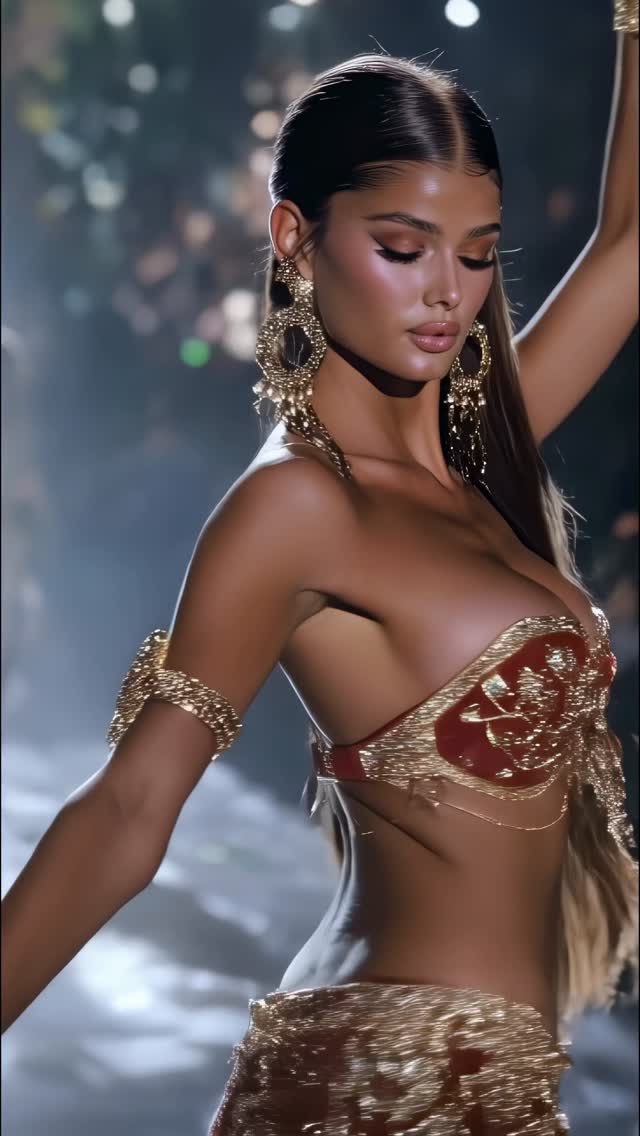
There are two hooks stacked on top of each other here. The first is pure visual magnetism: sharp eyes, glossy highlights, gold sparkle, and a dark bokeh background that makes the subject pop like a movie poster. The second is the collection effect. When you label something as a “collection”, viewers instinctively want to compare—Which one is best? Which outfit is your favorite? That comparison impulse turns a single frame into a mini-game.
Then comes the growth move: the caption turns attention into a lead. “Comment COURSE and I’ll send you the blueprint…” is a frictionless CTA. No link, no long explanation—just one keyword. That’s why visuals like this are so powerful for small creators: the image does the convincing, the CTA does the conversion.
| Signal | Evidence (from this image) | Mechanism | Replication action |
|---|---|---|---|
| Cinematic separation | Dark background + heavy bokeh + spotlight haze | Poster-like contrast boosts scroll-stop rate | Prompt “moody bokeh background” and “spotlight beam through haze” |
| Luxury texture | Gold beadwork and reflective jewelry with crisp specular glints | Texture detail triggers zooms, saves, and replays | Lock “gold embroidery, sequins, reflective chandelier earrings” |
| Comment-to-get blueprint | Caption asks for a single keyword (“COURSE”) | Low-friction CTA converts attention into leads | Use one keyword + promise a specific deliverable (“exact blueprint”, “preset pack”, “prompt sheet”) |
First, it’s the lens feel: a tight portrait crop with creamy background blur makes everything instantly editorial. Second, it’s specular discipline: highlights are sharp on gold, soft on skin, and almost absent in the background. That separation is what makes the subject look “lit” rather than “generated”. Third, it’s scale. The oversized chandelier earrings are a deliberate exaggeration—big enough to be readable in a thumbnail, detailed enough to reward a zoom.
If you want this vibe, don’t chase “beauty” in the abstract. Chase concrete evidence: center-part sleek hair, visible spotlight beam, reflective gold beadwork, and eyes that are pin-sharp.
| Prompt chunk | What it controls | Swap ideas (EN) |
|---|---|---|
| “tight beauty portrait, 85mm, shallow depth of field” | Editorial framing + bokeh | “50mm fashion editorial”, “close-up face crop”, “full body runway shot” |
| “spotlight beam through haze, dark bokeh stage” | Cinematic mood + separation | “neon club haze”, “theater spotlight”, “softbox studio with black backdrop” |
| “burgundy fabric with gold embroidery, sequins, beadwork” | Luxury texture density | “emerald velvet + gold trim”, “white pearl embroidery”, “chrome chainmail” |
| “oversized gold chandelier earrings, reflective filigree” | Thumbnail-read accessory signature | “crystal drop earrings”, “gold headpiece”, “layered coin belt” |
“Comment {KEYWORD} and I’ll send you the exact {deliverable} I used to make visuals like this.”
Change only one knob each run—either the costume color, the accessory signature, or the background mood. Everything else stays fixed until you like the baseline.